Identifying and Addressing A Fire: What to Look Out For

Key Takeaways

  • Recognising early warning signs like unusual smells, smoke, heat or electrical issues can give you vital seconds to respond safely.
  • Different fires produce distinct characteristics that help you identify the fuel source and choose the proper response.
  • Your immediate priority when discovering a fire is to raise the alarm and assess whether it’s safe to tackle or if evacuation is necessary.
  • Small fires in their early stages can sometimes be extinguished safely, but never put yourself at risk trying to fight a fire beyond your control.
  • Proper detection equipment and regular maintenance are your first line of defence in identifying fires before they spread.

Every year, fires cause devastating damage to homes and businesses across the UK. The difference between a minor incident and a catastrophe often comes down to one thing: how quickly someone spots the signs and takes action.

You don’t need to be a fire safety expert to recognise when something’s wrong. But knowing what to look for can literally save lives.

We will walk you through the warning signs that indicate a fire is developing, help you understand what you’re dealing with and explain how to respond safely. Whether you’re responsible for a workplace or simply want to protect your home, understanding fire behaviour is one of the most valuable skills you can have.

Early Warning Signs: Spotting Trouble Before It Starts

Fires rarely appear without warning. There’s usually a progression of signs that something’s going wrong. Catching these early gives you the best chance of preventing disaster.

Unusual Smells

Your nose is often your first line of defence.

Electrical fires produce a distinctive acrid smell, often described as burning plastic or rubber. You might notice this before you see any smoke. If you detect burning odours that you can’t immediately identify, don’t ignore them. Track down the source straight away.

Smouldering fires produce a different scent, often like burning paper or something musty. This can happen when something’s been left too close to a heat source or when materials are overheating without visible flames.

Smoke and Discolouration

Smoke is the most obvious warning sign, but not all smoke looks the same.

Thick black smoke typically indicates burning synthetic materials or oils. White or grey smoke often comes from burning wood, paper or fabric. You might also notice discolouration on walls or ceilings: yellow or brown staining that suggests heat damage or smoke exposure over time.

Heat and Sound

Before you see flames, you’ll often feel unusual heat. Walls, doors or floors that feel hot to the touch indicate fire on the other side.

You might also hear crackling, popping or hissing sounds that signal combustion.

Electrical Warning Signs

Flickering lights, sparking outlets or circuit breakers that keep tripping are all red flags. If you notice scorch marks around switches or outlets, or if plugs feel hot after being in use, these are severe warning signs. Don’t dismiss them.

Did You Know?

Many electrical fires start in areas people rarely check: behind walls, in roof spaces or inside appliances. Regular electrical inspections can catch problems before they become dangerous. In England, accidental electrical fires account for over half of all dwelling fires, making them one of the most common fire hazards in UK homes.

Understanding What You’re Dealing With

Once you’ve identified a fire, understanding the type you’re facing helps you make better decisions about how to respond.

UK Fire Classifications
Fire Class Fuel Type Examples Suitable Extinguishers
Class A Ordinary combustibles Wood, paper, fabric, plastics Water, foam, water mist
Class B Flammable liquids Petrol, oil, paint, solvents Foam, CO2, dry powder
Class C Flammable gases Propane, butane, natural gas Dry powder
Class F Cooking oils and fats Deep fat fryers, cooking oil Wet chemical
Electrical Electrical equipment Appliances, wiring, distribution boards CO2, dry powder, water mist
Fire Class
Class A
Fuel Type
Ordinary combustibles
Examples
Wood, paper, fabric, plastics
Suitable Extinguishers
Water, foam, water mist
Fire Class
Class B
Fuel Type
Flammable liquids
Examples
Petrol, oil, paint, solvents
Suitable Extinguishers
Foam, CO2, dry powder
Fire Class
Class C
Fuel Type
Flammable gases
Examples
Propane, butane, natural gas
Suitable Extinguishers
Dry powder
Fire Class
Class F
Fuel Type
Cooking oils and fats
Examples
Deep fat fryers, cooking oil
Suitable Extinguishers
Wet chemical
Fire Class
Electrical
Fuel Type
Electrical equipment
Examples
Appliances, wiring, distribution boards
Suitable Extinguishers
CO2, dry powder, water mist

Class A Fires: Ordinary Combustibles

These involve everyday materials such as wood, paper, fabric and plastics. They’re what most people picture when they think of a fire. These fires typically produce steady flames. You can extinguish them with water, foam or water mist extinguishers.

Class B Fires: Flammable Liquids

Petrol, oil, paint and other liquid fuels create Class B fires. They spread quickly and produce intense heat.

Never use water on these fires. It can spread the burning liquid and make things much worse.

Class C Fires: Flammable Gases

Less common in domestic settings but essential to recognise, these involve gases like propane or butane. They burn with a steady flame at the gas source. You need to shut off the gas supply.

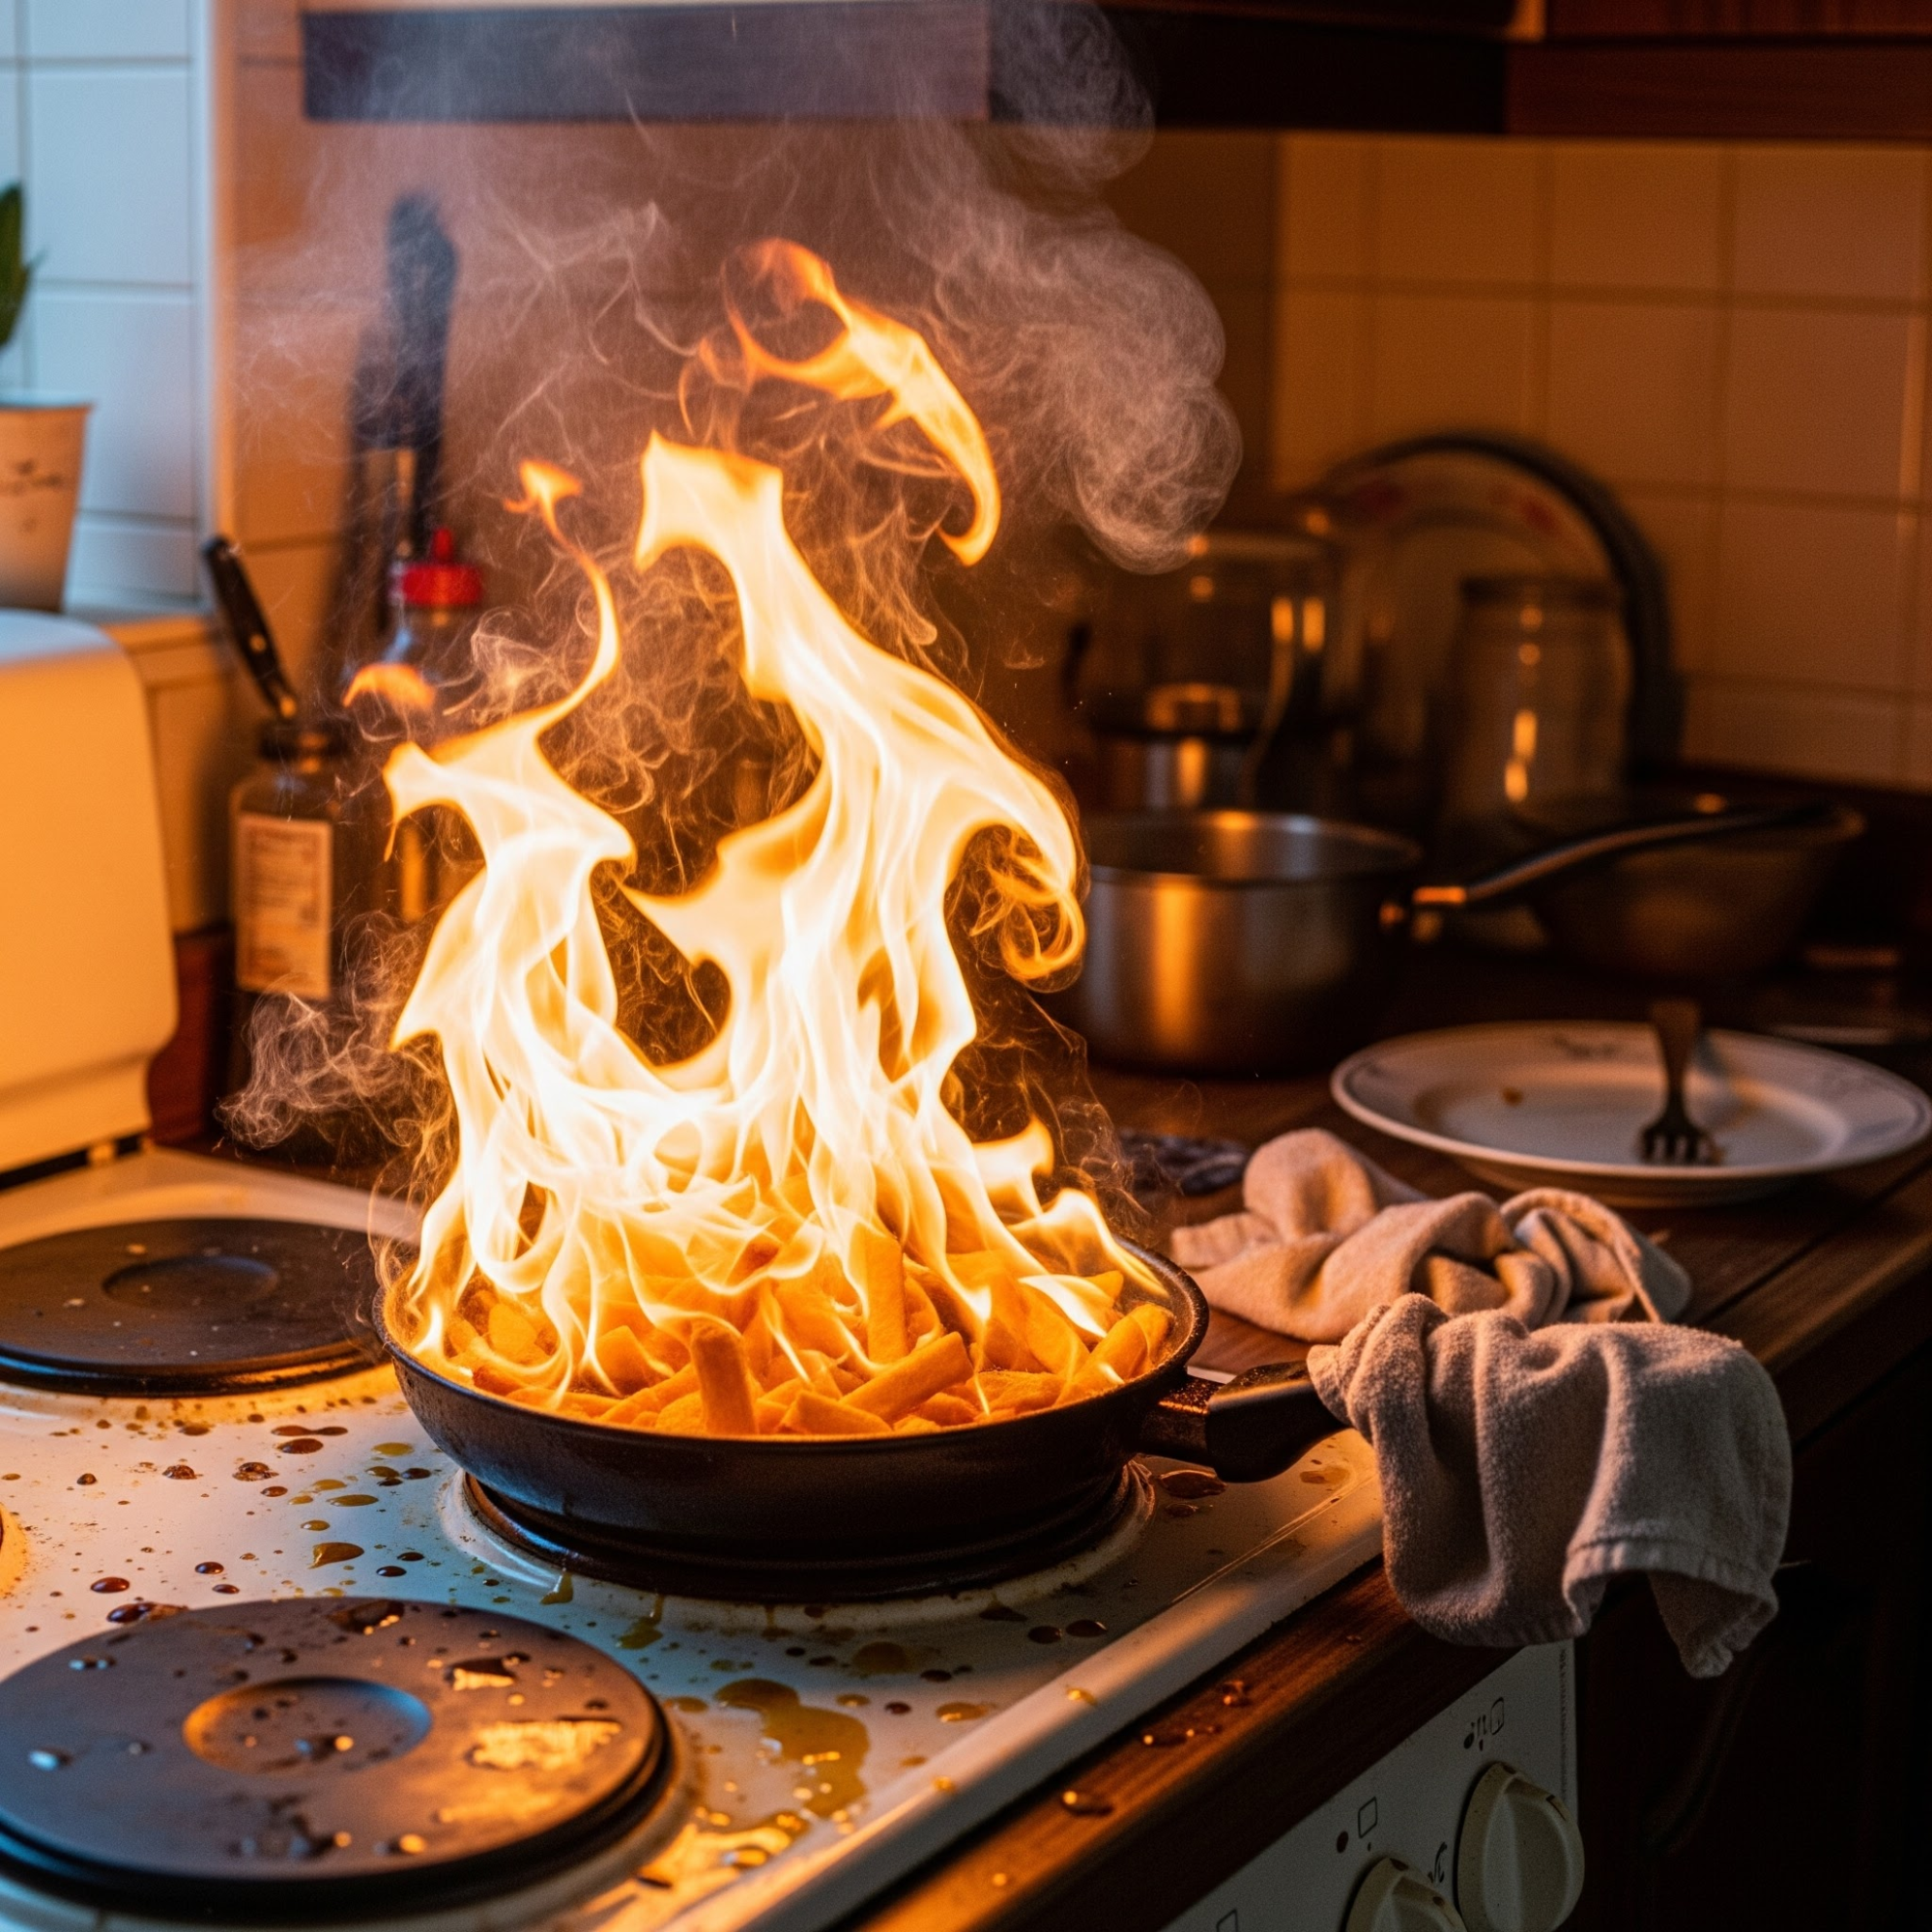
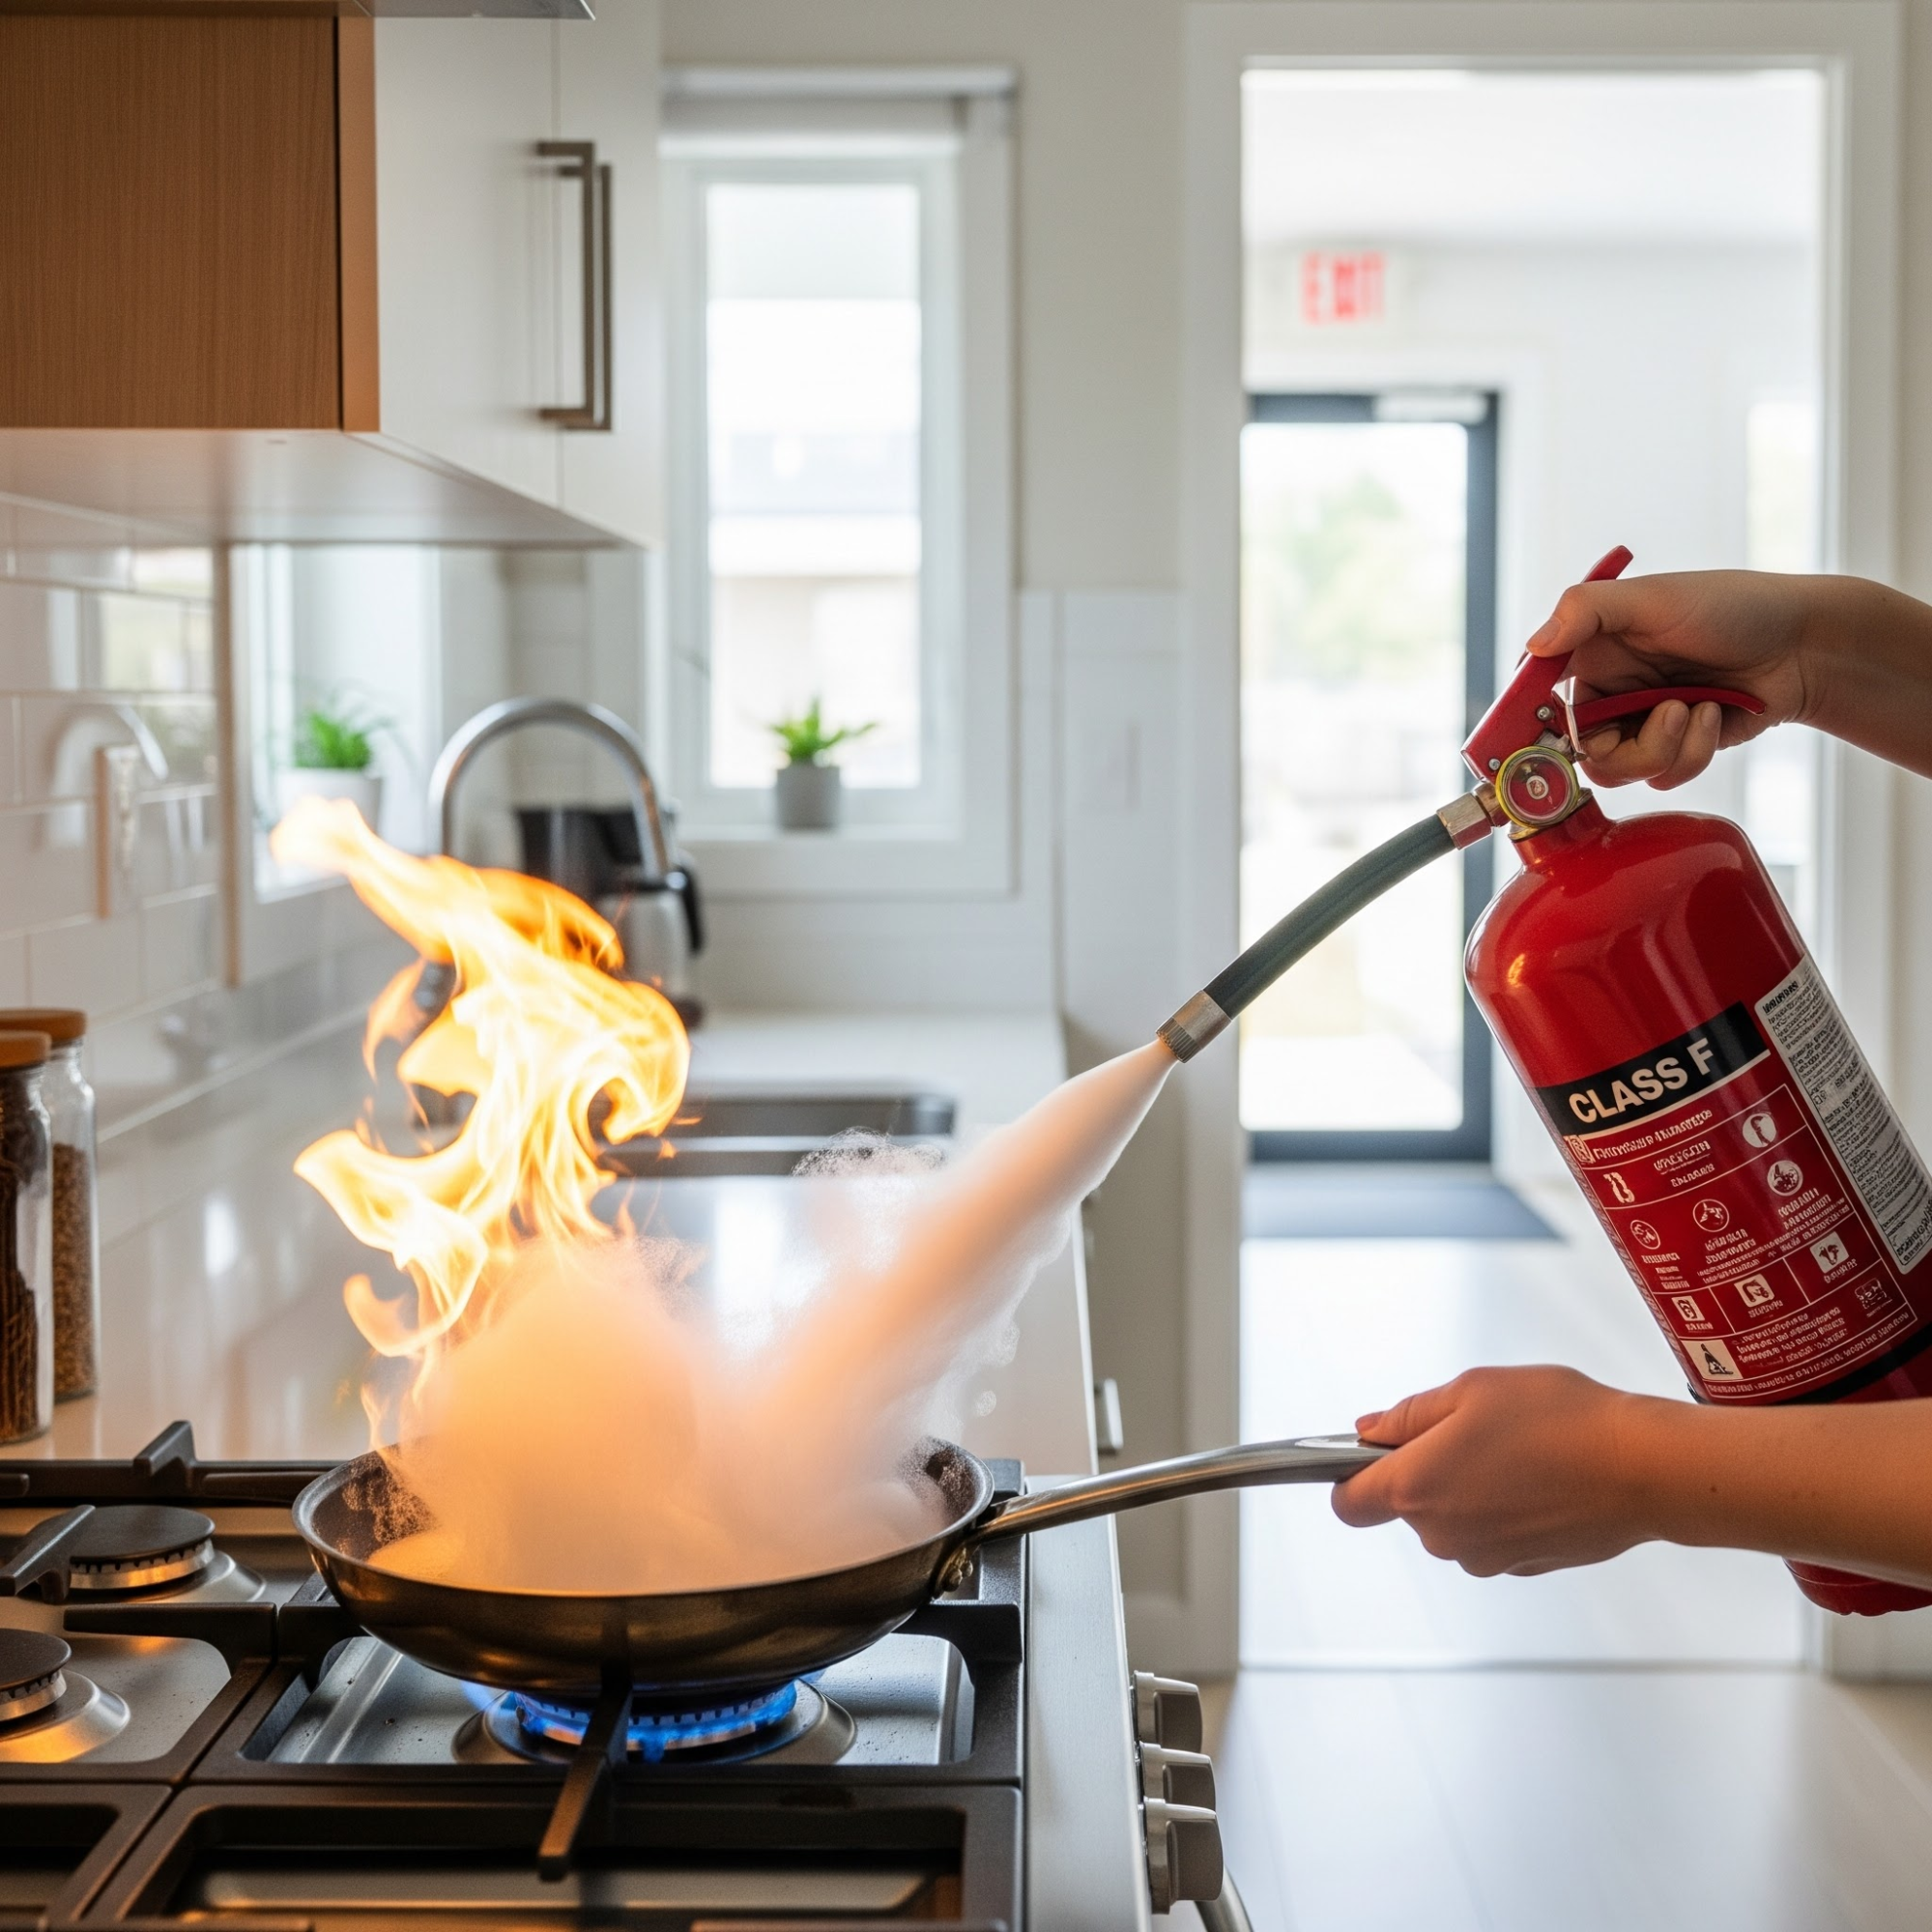
Class F Fires: Cooking Oils and Fats

Kitchen fires involving hot oil are hazardous. The oil can reach incredibly high temperatures. Adding water causes explosive spattering.

These require spec wet-chemical extinguishers.

Electrical Fires

These can look similar to other fire types but have an electrical source. They often start in appliances, wiring or distribution boards. Water mist extinguishers are suitable for use on electrical fires.

Your Immediate Response: The Critical First Moments

When you discover a fire, your response in those first moments can determine the outcome. Here’s what you should do.

Raise the Alarm

Before anything else, make sure everyone knows there’s a fire.

In a workplace, activate the fire alarm immediately. At home, shout to alert others and get them moving towards exits.

Assess the Situation Quickly

Take a few seconds to gauge:

  • How large is the fire?
  • What’s burning?
  • Is there smoke filling the room?
  • Do you have a clear escape route?
  • Is there a suitable fire extinguisher nearby?
This isn’t about being a hero. It’s about making a realistic assessment of whether you can safely do anything about the fire or if evacuation is your only option.

Call 999

Many people delay calling the fire brigade because they think they can handle it themselves. This is a mistake.

Even if you believe you can tackle the fire, get the professionals on their way. If the situation deteriorates, they’re already coming.

🔥 Fire Growth: The Facts

Research shows that modern fires in residential properties can reach flashover (when everything in a room ignites simultaneously) in as little as 3 minutes from ignition. This is significantly faster than fires from decades ago, mainly due to the prevalence of synthetic materials in modern furnishings. Once flashover occurs, survival becomes nearly impossible for anyone still in the room.

When to Fight and When to Flee

This is the most critical decision you’ll make. Getting it wrong can cost lives.

You Can Attempt to Tackle the Fire If… You Must Evacuate Immediately If…
The fire is small (no larger than a wastebasket). The fire is larger than you can safely manage.
It’s in the very early stages. Smoke is billowing down from the ceiling.
You have the correct type of extinguisher for the fuel involved. The fire is spreading rapidly.
You’ve been trained to use an extinguisher. You don’t have the right equipment.
You have a clear escape route behind you. You’re not confident in your ability to put it out.
The room isn’t filling with smoke. The heat is intense.
You feel confident you can put it out within seconds. Your escape route is threatened.
You Can Attempt to Tackle the Fire If…
The fire is small (no larger than a wastebasket).
It’s in the very early stages.
You have the correct type of extinguisher for the fuel involved.
You’ve been trained to use an extinguisher.
You have a clear escape route behind you.
The room isn’t filling with smoke.
You feel confident you can put it out within seconds.
You Must Evacuate Immediately If…
The fire is larger than you can safely manage.
Smoke is billowing down from the ceiling.
The fire is spreading rapidly.
You don’t have the right equipment.
You’re not confident in your ability to put it out.
The heat is intense.
Your escape route is threatened.

There’s no shame in leaving a fire to the professionals. That’s what they’re trained and equipped for. Your priority is always to get yourself and others to safety.  

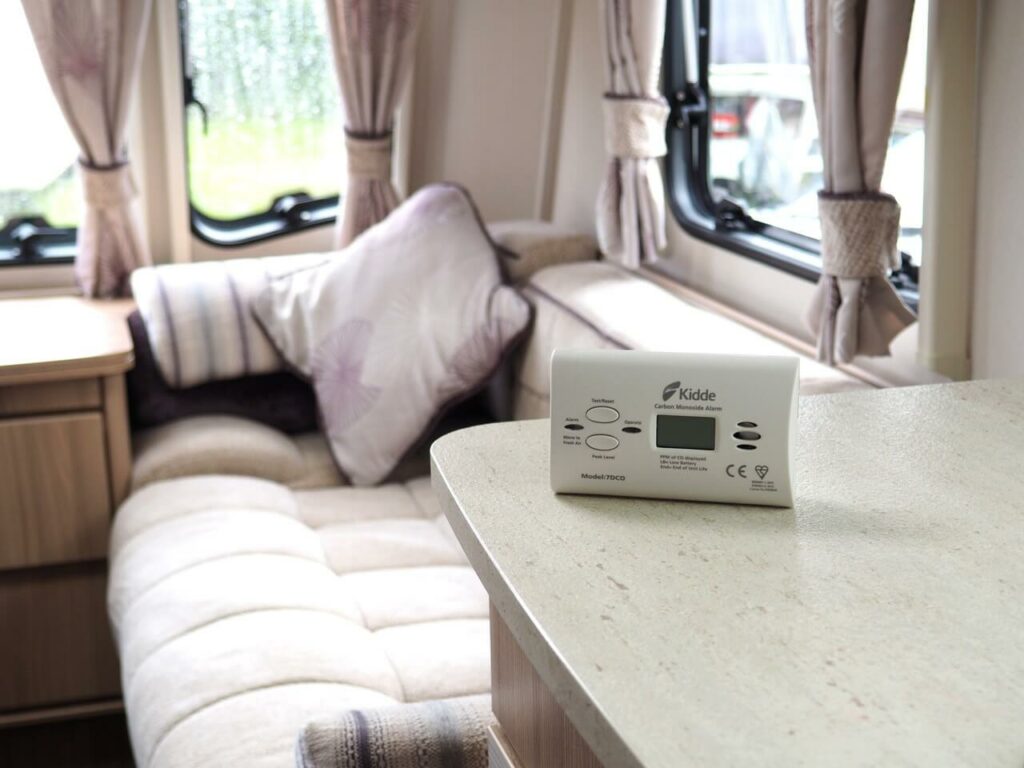
The Role of Detection and Prevention

The best response to a fire is spotting it before it becomes dangerous. This is where proper smoke, fire and gas detection equipment becomes invaluable.

Smoke Alarms

Interconnected smoke alarms throughout your property provide early warning when you might not be near the source of the fire. They detect smoke particles in the air and sound an alarm, giving you precious time to respond.

Different types of sensors suit different locations. Optical sensors work well in living areas. Heat alarms are better for kitchens where cooking might trigger false alarms.

Heat Detectors

These activate when the temperature reaches a certain level or rises rapidly. They’re useful in areas where smoke alarms might cause nuisance alarms but where you still need fire detection.

Regular Testing and Maintenance

Detection equipment only works if it’s properly maintained. Testing your alarms weekly takes seconds and ensures they’ll work when you need them.

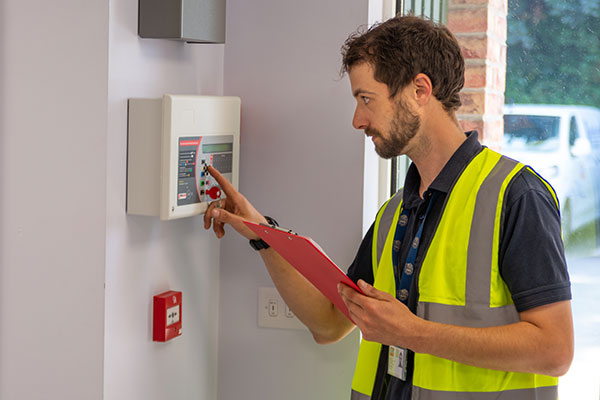
Professional fire alarm system servicing for commercial premises ensures your detection systems remain compliant and functional.

Replace batteries in standalone units at least annually. Replace the entire unit according to the manufacturer’s recommendations. Most modern alarms have a lifespan of 10 years.

Creating a Fire Response Plan

Having a plan before a fire occurs takes the panic out of the equation. Everyone in your household or workplace should know:

How to raise the alarm.

  • Where the exits are.
  • Where to meet outside.
  • Who’s responsible for checking specific areas (in workplaces).
  • Where fire extinguishers are located.
  • How to call 999.

Practice your evacuation regularly. In workplaces this is required by law, but it’s equally valuable in domestic settings. Children particularly benefit from knowing what to do without having to think about it in an emergency.

Common Fire Response Mistakes to Avoid  

Mistake Why Its Dangerous What To Do Instead
Using water on oil fires Causes explosive spattering. Use a wet chemical extinguisher or fire blanket.
Fighting fires alone No one to help if things go wrong. Always have someone with you who can call for help.
Blocking your exit route Traps you if fire spreads. Position yourself between the fire and the exit.
Ignoring smoke Smoke inhalation kills more people than flames. Evacuate immediately if smoke is building up.
Delaying the 999 call Fire brigade arrives too late. Call immediately upon discovering the fire.
Mistake
Using water on oil fires
Why Its Dangerous
Causes explosive spattering.
What To Do Instead
Use a wet chemical extinguisher or fire blanket.
Mistake
Fighting fires alone
Why Its Dangerous
No one to help if things go wrong.
What To Do Instead
Always have someone with you who can call for help.
Mistake
Blocking your exit route
Why Its Dangerous
Traps you if fire spreads.
What To Do Instead
Position yourself between the fire and the exit.
Mistake
Ignoring smoke
Why Its Dangerous
Smoke inhalation kills more people than flames.
What To Do Instead
Evacuate immediately if smoke is building up.
Mistake
Delaying the 999 call
Why Its Dangerous
Fire brigade arrives too late.
What To Do Instead
Call immediately upon discovering the fire.

Protecting Your Property and People

Fire safety isn’t just about responding to fires. It’s about creating an environment where fires are less likely to start and easier to manage if they do.

Keep potential fuel sources away from heat sources. Don’t overload electrical sockets. Store flammable materials properly. Keep escape routes clear of obstructions. Install appropriate fire safety equipment for your property type and use.

Regular maintenance of electrical systems, heating equipment and cooking appliances reduces the risk of fire starting in the first place. Many fires are preventable with basic housekeeping and awareness.

Taking Action

Understanding how to identify and respond to fires is essential knowledge. But it needs to be backed up with the right equipment and professional support.

Whether you need advice on the best detection systems for your property, want to arrange servicing for existing equipment or need guidance on creating a comprehensive fire safety plan, our team can help.

Get in touch with our fire safety experts to discuss your specific needs. We’ll help you create a safer environment for everyone who lives, works or visits your property.

Remember: the time to prepare for a fire is before it happens, not during the emergency itself.

★★★★★

“Easy to use website. I found the ideal produce to replace my smoke alarm sytem quickly and easily. Update to a modern version of my old system. Good price, fast delivery, easy to fit. Fixed to the original interlinked wiring in place. Very tidy, modern looking system. Would shop here again.”

Ian Beevers

★★★★★

“Great business to deal with. Good information about different fire extinguisher types etc. on websites and delivered the next day. Would certainy use again.”

Michael Harding

Mel Saunders

Head of Marketing

With over 20 years of experience in content writing, design and marketing, Mel now heads up the Content & Marketing Team at Safelincs. Having been in the fire safety industry for over 5 years, Mel has now developed a deep understanding of some of the critical issues facing the industry. Alongside her team, she aims to support the public with resources and information to help them improve fire safety at home, in the workplace or in 3rd sector organisations.

Why are fire drills important?

Fire drills aren’t just about compliance. They’re your chance to test whether your fire exit equipment actually works when you need it most. At Safelincs, we’ve seen that properly equipped fire exits, combined with regular drills, can make the difference between an orderly evacuation and dangerous confusion. When you conduct a fire drill, you’re not only training people but also stress testing every piece of hardware that stands between your building occupants and safety.

The connection between fire drills and fire exit equipment is straightforward. Drills reveal equipment failures before real emergencies strike. That panic bar that seemed fine during installation might stick when you test it. The illuminated exit sign that looks adequate in daylight could be invisible when the power fails during your evening drill.

This guide explores nine categories of fire exit equipment that should feature in your fire drill preparations. We’ll help you identify what works and what needs attention before a real emergency tests your systems.

What Fire Exit Equipment Should You Check During Fire Drills?

Fire drills provide the perfect opportunity to assess your fire exit equipment under realistic conditions. Government guidance recommends conducting at least one fire drill per year, though more frequent drills are advisable depending on your fire risk assessment and premises type. Each one should include checking that your exit hardware functions correctly.

Here’s what you need to consider across nine equipment categories.

Emergency Push Pads and Bolts

Emergency push pads are designed for commercial premises where trained staff understand the exit devices. These smaller units require more precision than panic bars. That makes them ideal for offices where employees have received proper fire safety training.

During fire drills, test whether your push pads release smoothly with a single action. Staff should be able to operate them instinctively, even under pressure. If anyone struggles during a drill, that’s your signal. You need to provide more training or consider whether panic bars would be more appropriate for your building.

Check that the vertical bolts slide freely and that the latches engage properly when the doors close. Mechanisms can seize if you don’t use them regularly.

Fire Drill Checklist for Push Pads

  • Single-action operation without hesitation.
  • Smooth bolt or latch movement.
  • Clear signage indicating push location.
  • No obstructions are preventing the door from opening.

Panic Bars with Latches or Bolts

Panic bars are essential for public buildings where occupants might not be familiar with the premises. These full-width bars open with body pressure. Perfect for situations where genuine panic could occur.

Your fire drills should confirm that anyone can operate panic bars effectively. Children, older adults or those with reduced mobility are included. Push the bar along its entire length to ensure consistent activation. Some units have wear points where the mechanism becomes less responsive. Drills help you spot these issues.

Verify that the door opens fully without catching. Check it returns to the closed, secured position when released.

If your panic bar is fitted with an outside access device, test both sides during drills. The internal release should work flawlessly. External security remains intact.  

External Access Devices

Outside access devices allow authorised entry through emergency exits without compromising security or safe escape provisions. These typically use keypads, key cylinders or proximity readers.

Fire drills reveal whether your access codes still work. They also show whether staff remember them under pressure. Test from both sides. Verify that the external entry functions correctly. Internal escape remains unrestricted.

Check that code locks haven’t developed sticky buttons and that key cylinders turn smoothly. These are simple issues that can cause serious problems when seconds count.

Consider whether the device location makes sense during evacuation. Can staff operate the external access if they need to guide visitors through exits? Your drill will expose any practical difficulties.

Fire Exit Door Security

Fire exit door alarms and anti-tamper devices discourage unauthorised use. They maintain emergency escape capability. During drills, these systems should activate as designed. Alert staff to door usage without creating confusion about whether there’s a genuine emergency.

Test that alarms sound at appropriate volumes. Check that key overrides or keypad controls work reliably. Battery-powered alarms should maintain sufficient charge. Wired systems should integrate properly with your alarm infrastructure.

Your drill provides the ideal moment to verify these functions. You’ll know whether the alarm activated appropriately when someone uses the fire exit.

If you’ve installed breakable tube devices or glass protection covers over door releases, drills help you assess whether staff understand how to operate them correctly. Misunderstanding during a real emergency could delay evacuation.

Equipment Type Whats To Test During Drills
Door alarms Volume, audibility, battery life and reset function.
Keypad controls Code memory, button responsiveness and manager override.
Break glass units Staff understanding, replacement tube availability.
Call point protectors Ease of opening, hinge function and alarm integration.
Equipment Type
Door alarms
Whats To Test During Drills
Volume, audibility, battery life and reset function.
Equipment Type
Keypad controls
Whats To Test During Drills
Code memory, button responsiveness and manager override.
Equipment Type
Break glass units
Whats To Test During Drills
Staff understanding, replacement tube availability.
Equipment Type
Call point protectors
Whats To Test During Drills
Ease of opening, hinge function and alarm integration.

Magnetic Locks for Access Control

Magnetic locks secure doors during regular operation. They release automatically when the fire alarm sounds. Your fire drills must confirm this fail-safe operation every single time. There’s no room for error with magnetic locking systems.

When you trigger your alarm during a drill, magnetic locks should release immediately. They must remain released throughout the evacuation. Test that the manual override buttons work from both sides. Check that break-glass units provide a reliable manual release. If your system includes time-delayed access, verify that emergency override functions supersede normal delays.

Watch for doors that fail to release or that re-lock before the drill concludes. These failures indicate power supply issues, faulty control systems or inadequate integration with your fire alarm panel. All serious concerns that drills help you identify before they endanger lives.

Illuminated Emergency Fire Exit Signs

Illuminated fire exit signs remain visible when mains power fails. They use battery backup to guide people to safety. Fire drills conducted during different lighting conditions test whether your signs perform as required.

Schedule at least one drill during evening hours or in darkened conditions to assess sign visibility. Emergency lighting should activate automatically when power fails. Signs should remain illuminated for their full backup duration. Typically one to three hours.

Check that directional arrows accurately indicate the escape route. Verify that signs remain visible through smoke. That’s why mounting height and positioning matter so much.

LED signs offer advantages for visibility and reliability. They typically have lower energy consumption and longer life than older fluorescent units. If your drill reveals poor visibility, dimming or failed backup batteries, that’s your prompt to upgrade before visibility becomes critical during an actual emergency.

Fire Exit Door Signs

Self-adhesive fire exit door signs seem basic. But they play a crucial role in guiding people during evacuations. Photoluminescent signs absorb ambient light and glow in the dark without requiring power or batteries.

During fire drills, especially those conducted in low light, assess whether your door signs provide adequate guidance. Are they positioned at eye level where people naturally look? Do they remain visible as people approach the exit?

Photoluminescent materials need adequate light exposure to charge effectively. Signs in poorly lit areas won’t glow sufficiently when required.

Replace any signs that have become damaged, discoloured or obscured by furniture or displays. Your drill observations should guide sign placement decisions. Evacuation routes must remain clear and well-marked from any starting point in the building.

Photoluminescent Escape Route Marking

Photoluminescent escape route marking systems provide continuous guidance along evacuation paths. They’re particularly valuable in buildings where visitors might not know the layout. These systems charge under standard lighting and glow for several hours when it gets dark.

Fire drills help you evaluate whether your marking system provides sufficient continuous guidance. Walk the escape route during your drill and note any gaps in marking that could cause people to become disoriented.

Pay attention to direction changes, doorways and stairwells. Areas where confusion commonly occurs during evacuations.

Check that floor markings remain intact and unobscured. High traffic areas can wear down adhesive strips. Cleaning routines might damage some marking systems. Your regular drills provide ongoing assessment of whether your photoluminescent system still offers the continuous guidance you installed it to provide.

Key Boxes and Key Guards

Key boxes store emergency exit-door keys. They allow authorised access and maintain security. These are particularly relevant for premises that require locked external doors, balanced against emergency escape requirements.

Your fire drills should include testing key box accessibility and key functionality. Can authorised staff access keys quickly under pressure? Do the stored keys actually open the intended doors? These seem like obvious questions. But we’ve encountered situations where keys were stored in the wrong box or where replacement doors weren’t matched with corresponding key updates.

Position key boxes where they’re accessible during evacuations but secure from casual tampering. Break glass key boxes should open easily when needed. Test this during drills to ensure the glass breaks cleanly without risk of injury and that the keys remain accessible once the glass is broken.

Equipment Category Primary Function Drill Testing Priority Common Failure Points
Emergency Push Pads Secure exit for trained staff Smooth single-action release Seized mechanisms, unclear signage
Panic Bars Public building rapid exit Universal ease of operation Inconsistent activation, worn components
External Access Devices Controlled re-entry Code memory, smooth operation Sticky buttons, forgotten codes
Fire Exit Alarms Unauthorised use deterrent Alarm volume, reset function Dead batteries, false alarm sensitivity
Magnetic Locks Access control with a fail-safe Automatic alarm release Failed integration, delayed release
Illuminated Signs Powered exit guidance Battery backup, visibility Depleted batteries, poor positioning
Door Signs Unpowered exit marking Photoluminescent charge Wear, inadequate ambient light exposure
Route Marking Continuous path guidance Gap identification Adhesive failure, obstruction
Key Boxes Emergency key access Key availability, glass breakage Wrong keys, inaccessible location
Equipment Category
Emergency Push Pads
Primary Function
Secure exit for trained staff
Drill Testing Priority
Smooth single-action release
Common Failure Points
Seized mechanisms, unclear signage
Equipment Category
Panic Bars
Primary Function
Public building rapid exit
Drill Testing Priority
Universal ease of operation
Common Failure Points
Inconsistent activation, worn components
Equipment Category
External Access Devices
Primary Function
Controlled re-entry
Drill Testing Priority
Code memory, smooth operation
Common Failure Points
Sticky buttons, forgotten codes
Equipment Category
Fire Exit Alarms
Primary Function
Unauthorised use deterrent
Drill Testing Priority
Alarm volume, reset function
Common Failure Points
Dead batteries, false alarm sensitivity
Equipment Category
Magnetic Locks
Primary Function
Access control with a fail-safe
Drill Testing Priority
Automatic alarm release
Common Failure Points
Failed integration, delayed release
Equipment Category
Illuminated Signs
Primary Function
Powered exit guidance
Drill Testing Priority
Battery backup, visibility
Common Failure Points
Depleted batteries, poor positioning
Equipment Category
Door Signs
Primary Function
Unpowered exit marking
Drill Testing Priority
Photoluminescent charge
Common Failure Points
Wear, inadequate ambient light exposure
Equipment Category
Route Marking
Primary Function
Continuous path guidance
Drill Testing Priority
Gap identification
Common Failure Points
Adhesive failure, obstruction
Equipment Category
Key Boxes
Primary Function
Emergency key access
Drill Testing Priority
Key availability, glass breakage
Common Failure Points
Wrong keys, inaccessible location

Making Fire Drills Work for Your Fire Exit Equipment

Fire drills aren’t just training exercises. They’re diagnostic tools revealing how your fire exit equipment performs under realistic conditions. Each drill provides data about equipment reliability, staff readiness and building layout effectiveness.

Record your observations systematically. Note any equipment that doesn’t function as expected and any staff confusion about exit procedures.

The Regulatory Reform (Fire Safety) Order 2005 requires that appropriate procedures, including safety drills, be established and maintained. Government guidance recommends a minimum of one fire drill annually, but conducting drills more frequently builds genuine muscle memory. Quarterly or even monthly drills provide more opportunities to assess equipment performance.

Vary your drill scenarios. Block different exits to test alternative routes. Conduct drills during different shifts to ensure all staff are trained. Schedule occasional drills in the dark to assess the adequacy of emergency lighting.

When your fire drill reveals equipment issues, you’ve gained invaluable information. Sticky mechanisms, insufficient lighting, unclear signage or access problems. These are vulnerabilities that need addressing. This is precisely what drills are designed to achieve. Identifying weaknesses before they matter in a genuine emergency.

Our comprehensive range of fire exit equipment includes everything you need to create safe, compliant evacuation routes backed by reliable hardware. Whether you’re fitting out a new building, upgrading existing equipment or replacing components identified as problematic during fire drills, we provide the quality products and expert advice that help you maintain genuinely effective emergency preparedness.

Browse our fire exit equipment category to find the right solutions for your premises. Or contact our specialist team for personalised advice on creating exit systems that perform flawlessly when they’re needed most.

★★★★★

“Easy to use website. I found the ideal produce to replace my smoke alarm sytem quickly and easily. Update to a modern version of my old system. Good price, fast delivery, easy to fit. Fixed to the original interlinked wiring in place. Very tidy, modern looking system. Would shop here again.”

Ian Beevers

★★★★★

“Great business to deal with. Good information about different fire extinguisher types etc. on websites and delivered the next day. Would certainy use again.”

Michael Harding

What are COSHH regulations?

The three main regulations of COSHH are Regulations 6 (risk assessment), 7 (prevention or control of exposure), and 12 (information, instruction and training). These requirements form the backbone of the Control of Substances Hazardous to Health Regulations 2002, protecting workers from dangerous substances at work. They work together to identify risks, implement controls, and teach people how to stay safe around hazardous materials, including essential emergency evacuation equipment.

Key Takeaways

  • COSHH protects UK workers from health risks caused by hazardous substances in the workplace.
  • Regulation 6 requires risk assessments before work with hazardous substances begins.
  • Regulation 7 requires you to prevent exposure or, if prevention isn’t reasonably practicable, to control it.
  • Regulation 12 requires information, instruction and training for anyone working with hazardous substances.
  • Breaking COSHH rules is a criminal offence with unlimited fines.
  • Around 13,000 UK deaths each year are linked back to workplace exposure to hazardous substances.

What Is COSHH and Why Should You Care?

COSHH stands for the Control of Substances Hazardous to Health Regulations 2002. These UK regulations protect people from substances that can harm their health at work. The rules cover chemicals, fumes, dust, vapours and biological agents.

The numbers tell a stark story. Each year, an estimated 13,000 deaths in the UK are linked to past exposure at work to hazardous substances. That’s mainly from dust or chemicals. These aren’t just statistics. They’re people.

Image

What COSHH Covers

  • Chemicals and cleaning products
  • Fumes and vapours
  • Dust (including wood dust, silica, flour)
  • Biological agents (bacteria, viruses)
  • Substances created by work activities

COSHH applies to nearly every workplace. Offices use cleaning products. Construction sites create dust. Hair salons work with chemical treatments. Manufacturing plants handle industrial solvents. If hazardous substances are present, COSHH applies to you.

Regulation 6: Risk Assessment Comes First  

You can’t start work with hazardous substances until you’ve done a proper risk assessment. That’s the law under Regulation 6.

This isn’t about ticking boxes. You need to identify every hazardous substance in your workplace and work out what harm it could cause. Who might be exposed? How often? For how long? What could go wrong?

Your assessment must cover:

  • The hazardous properties of each substance.
  • How you use it in your workplace.
  • Who’s at risk and why.
  • What controls you already have.
  • Plans for accidents and emergencies.

Got five or more employees? You must write it down. This record proves compliance, helps you track whether your controls work and provides crucial evidence if something goes wrong.

Risk assessments aren’t static documents either. Review them regularly. Update them when you introduce new substances, change how you work or if health checks suggest your controls aren’t good enough.

Regulation 7: Stop Exposure in Its Tracks  

This is where theory meets practice. Regulation 7 is precise: prevent exposure to hazardous substances wherever reasonably practicable. If prevention isn’t possible, control that exposure adequately.

Think of it as a ladder. You start at the top and work your way down.

The COSHH Hierarchy of Controls

Priority Control Method Example
1st Eliminate Stop using the substance completely.
2nd Substitute Use a safer alternative product.
3rd Engineering Controls Enclosed systems, ventilation, automation.
4th Administrative Controls Limit exposure time, supervision and training.
5th PPE Gloves, masks, protective clothing (last resort).
Priority
1st
Control Method
Eliminate
Example
Stop using the substance completely.
Priority
2nd
Control Method
Substitute
Example
Use a safer alternative product.
Priority
3rd
Control Method
Engineering Controls
Example
Enclosed systems, ventilation, automation.
Priority
4th
Control Method
Administrative Controls
Example
Limit exposure time, supervision and training.
Priority
5th
Control Method
PPE
Example
Gloves, masks, protective clothing (last resort).

Can you eliminate the hazardous substance? Stop using it altogether? That’s your first question. No substance means no risk.

If you can’t eliminate it, try substitution. Replace that toxic cleaning chemical with something safer. Swap out a dangerous solvent for a less harmful option.

Still can’t avoid it? Install engineering controls. Enclose the process. Add local exhaust ventilation. Automate to reduce human contact. The regulations are clear: use engineering controls before you even think about PPE.

Personal protective equipment is your last line of defence, not your first. Use it only when other controls aren’t enough.

Regulation 12: Knowledge Keeps People Safe  

You can have the best controls in the world. But if your people don’t understand them, they’re useless.

Regulation 12 requires you to provide employees with information, instruction, and training before they work with hazardous substances. Not after. Before.

They need to know:

  • What substances are they working with.
  • What harm can these substances cause.
  • The main findings of your risk assessment.
  • How the controls work and why they matter.
  • How to spot when something’s wrong.

Training covers the practical stuff too. How do you use that ventilation system properly? When should you wear a mask? What do you do if there’s a spillage?

  Training Requirements

  • Must happen before exposure begins
  • Needs regular refreshers
  • Should use plain language, not jargon
  • Must cover emergency procedures
  • Has to be recorded

And it’s not just a one-off thing. Give refresher training regularly. Update it when you introduce new substances or change your processes.  

Image

Other COSHH Requirements

The three main regulations don’t work on their own. Several others support them.

Regulation 8 requires proper use of control measures. Regulation 9 requires you to maintain and test those controls. Local exhaust ventilation systems need thorough examination at a minimum every 14 months.

Regulation 10 covers exposure monitoring. If your risk assessment shows it’s necessary, you must monitor exposure at regular intervals. This tells you whether your controls actually work.

Regulation 11 deals with health surveillance. Some substances require monitoring workers’ health. This might mean questionnaires about symptoms, skin condition inspections or complete medical examinations.

Regulation 13 requires emergency planning. You need arrangements for accidents and incidents. That means first-aid facilities, practised procedures and a way to raise the alarm quickly.  

Who’s Responsible Under COSHH?

Employers carry the legal duty. You must conduct risk assessments, implement controls, provide training, and maintain safety measures. You can appoint someone competent to help, but you can’t delegate away responsibility.

But employees have duties too. You must:

  • Follow the control measures.
  • Use PPE correctly.
  • Report defects or concerns.
  • Take reasonable care of your own safety.
  • Do not put others at risk.

Self-employed? Most COSHH rules apply to you, except Regulations 10 and 11, which do not apply to you. But if you employ anyone or control others’ exposure, the complete regulations apply.

The Health and Safety Executive and local authorities enforce COSHH. They inspect workplaces and investigate incidents. Breaking these regulations is a criminal offence.

⚠️ Penalties for Breaking COSHH

  • Unlimited fines for individuals and companies.
  • Prosecution possible.
  • Imprisonment in severe cases.
  • Reputation damage.
  • Compensation claims.

What Happens When You Get It Wrong?

The consequences go far beyond fines, though those can be unlimited.

Health effects can be devastating. Skin conditions. Breathing problems. Occupational asthma. Cancer. Some effects appear immediately. Others take years to develop.

Then there’s the financial hit. Compensation claims. Lost working days. Recruitment and training costs for replacement staff. Business disruption. The HSE says work-related illnesses cost millions each year.

Your reputation takes a beating, too. Nobody wants to work for or with a company that doesn’t protect its people. In competitive markets, a poor safety record can kill your business.

Keep Your People Safe

Understanding COSHH’s three main regulations matters because lives depend on it. Regulation 6 identifies the dangers. Regulation 7 stops exposure. Regulation 12 gives people the knowledge they need.

These aren’t bureaucratic hurdles. They’re practical steps that save lives and prevent suffering.

Whether you run a factory, building site or office, COSHH compliance is required by law. But more than that, it’s about doing right by the people who work for you.

Need help making sense of COSHH in your workplace? Want advice on the proper safety equipment for your specific situation? We’re here to help at Safelincs. Get in touch with us today, and we’ll give you the expert support you need.  

Frequently Asked Questions

What does COSHH stand for?
COSHH stands for the Control of Substances Hazardous to Health Regulations 2002. These UK regulations require employers to protect workers from health risks through risk assessment, exposure control and training.
Which substances aren’t covered by COSHH?
Asbestos, lead and radioactive substances have separate regulations. These are the Control of Asbestos Regulations 2012, the Control of Lead at Work Regulations 2002, and the Ionising Radiations Regulations 2017.
How often should you review COSHH risk assessments?
Review risk assessments regularly and whenever there’s reason to think they’re no longer valid. This includes when you introduce new substances, change processes or if health checks show controls aren’t working.
Do small businesses need to follow COSHH?
COSHH applies to all employers who work with hazardous substances, regardless of size. If you have five or more employees, you must document your risk assessment findings.
What’s the penalty for breaking COSHH regulations?
Breaking COSHH is a criminal offence with unlimited fines. Both people and companies can be prosecuted. In severe cases, employers may face imprisonment for failing to protect workers.
★★★★★

“Easy to use website. I found the ideal produce to replace my smoke alarm sytem quickly and easily. Update to a modern version of my old system. Good price, fast delivery, easy to fit. Fixed to the original interlinked wiring in place. Very tidy, modern looking system. Would shop here again.”

Ian Beevers

★★★★★

“Great business to deal with. Good information about different fire extinguisher types etc. on websites and delivered the next day. Would certainy use again.”

Michael Harding

Chip Pan Fire Risks

Key Takeaways

  • Chip pan fires remain one of the most dangerous kitchen hazards in the UK, causing around 1,200 incidents annually and resulting in thousands of injuries.
  • Overheated oil, combined with common mistakes like adding water or wet chips, creates explosive conditions that can engulf a kitchen in seconds.
  • Most chip pan fires happen between 10pm and 4am, often involving alcohol, unattended cooking and overfilled pans.
  • Never throw water on a chip pan fire, as it can cause a violent fireball that spreads rapidly throughout your kitchen.
  • Thermostat-controlled deep fat fryers and oven chips offer much safer alternatives to traditional chip pans, eliminating the risk of oil overheating.
  • If a chip pan fire breaks out, your priority is getting everyone out safely and calling 999 rather than attempting to fight the fire yourself.

That golden basket of crispy chips might be a British staple. But the traditional chip pan remains one of the most dangerous items in UK homes.

Chip pan fires continue to cause serious injuries and property damage across the country, despite decades of fire safety campaigns.

Why are chip pans so risky? What causes these fires? And most importantly, how can you protect yourself and your family?

Image

Why Chip Pan Fires Are So Dangerous

Chip pan fires aren’t your average kitchen mishap.

What makes chip pan fires particularly frightening is how quickly they develop and how intensely they burn. You’re heating several pints of oil to temperatures between 160°C and 190°C. At these temperatures, cooking oil becomes ideal fuel. Once it ignites, it burns hot and spreads fast.

The real danger comes from how people react. Your instinct might be to throw water on the flames or move the pan to the sink. Both actions create explosive results.

Water and burning oil don’t mix. They explode. The water vaporises instantly when it hits the superheated oil, expanding to roughly 1,700 times its original volume. This explosive expansion sends a fireball of burning oil shooting upwards and outwards. You could suffer severe burns. Kitchen cabinets, curtains and anything else nearby can catch fire within seconds.

Image

Common Causes of Chip Pan Fires in UK Homes

Understanding what triggers chip pan fires helps you avoid the pitfalls. Here’s what causes most incidents:

  • Overheated oil is the number one cause. When oil reaches its smoke point (around 230°C for most cooking oils), it’s dangerously close to its flash point: the temperature at which it ignites on its own. See smoke rising from your pan? It’s already too hot. You’re moments away from a fire.
  • Leaving the pan unattended leads to a large number of incidents. You pop the chips in. The phone rings. The doorbell goes. You nip to the loo, just for a minute. That’s all it takes. Fire brigades across the UK report that most chip pan fires are caused by unattended cooking.
  • Alcohol and late-night cooking create a dangerous mix.
  • Overfilling the pan is another common mistake. When you drop chips into an overfilled pan, the oil can overflow onto the hot hob and ignite immediately. The safe rule? Never fill a chip pan more than one-third full.
  • Adding wet or frozen chips to hot oil can cause violent splattering and cause the oil to overflow. Ice crystals on frozen chips vaporise instantly, causing the oil to bubble up. Always dry chips thoroughly before frying.

How to Prevent Chip Pan Fires

You can dramatically reduce your risk. Here’s how:

✓ Ditch the chip pan. This is what every fire brigade in the UK advises. Oven chips offer a safer alternative with no hot oil involved. Air fryers have also changed home cooking, giving you crispy chips without the fire risks of deep-fat frying.

If you’re determined to deep-fry at home, invest in a thermostat-controlled electric deep-fat fryer. These devices have built-in safety features that prevent the oil from ever reaching dangerous temperatures. The thermostat automatically regulates heat, eliminating the risk of overheating that can cause chip pan fires. Some local fire and rescue services even offer free fryer exchanges, swapping your old chip pan for a modern electric fryer.

 Never leave cooking unattended. Have to leave the kitchen, even for a moment? Turn off the heat and remove the pan from the hob. Don’t tell yourself it’ll be fine for “just a second”. Fires start when your attention stops.

 Keep the pan only one-third full of oil. This gives you a safety buffer when you add food, preventing overflow and reducing the risk of flames.

 Dry your chips before adding them to hot oil. Pat them with kitchen paper to remove excess moisture. Make sure frozen chips are defrosted.

 Never cook after drinking alcohol or when tired. Your reactions are slower. Your judgment is impaired. You’re more likely to fall asleep or forget about the pan. Hungry after a night out? Make a sandwich or order a takeaway instead.

 Test the oil temperature before adding food. Drop in a small piece of bread or a single chip. Does it crisp and brown within 60 seconds? The oil is ready. It doesn’t bubble at all? The oil needs to be heated more. It burns black instantly? The oil is too hot. Turn off the heat and let it cool.

For more information on managing cooking oil fires, including other oil-related fire hazards in your kitchen, check out our detailed guide.

What to Do If a Chip Pan Fire Starts

Fires can still happen despite your best efforts. Knowing the correct response could save your life and your home.

❌ Never, ever throw water on a chip pan fire.  We can’t emphasise this enough. Water creates an explosive fireball that will spread the fire and cause severe burns. Every fire brigade in the country warns against this. Yet it remains the most common dangerous response.

❌ Don’t move the pan. The handle will be hot. The pan is heavy. Moving it risks spilling burning oil on yourself or spreading the fire. Leave it where it is.

❌ Turn off the heat if you can reach the controls safely. But only if you can do this without leaning over the flames. For electric hobs, you can switch off the electricity at the mains. For gas hobs, you may need to turn off the gas supply if it’s accessible. Can’t reach the controls safely? Leave them alone.

❌ Don’t attempt to tackle the fire yourself. Old advice about using damp tea towels or fire blankets is now considered too risky by fire services. The risk of severe burns is too high. Even experienced firefighters struggle to extinguish oil fires safely.

❌ Get everyone out immediately. Leave the room. Close the door behind you to contain the fire and limit the amount of oxygen. Evacuate everyone from the property. Call 999 from outside or a neighbour’s house. Never go back inside.

❌ Do you have a Class F fire extinguisher designed for cooking oil fires? Have you been trained to use it? Consider using it, but only if the fire is small and contained to the pan and you have a clear exit route. Class F extinguishers contain a potassium-based solution that reacts with the oil to create a soapy layer, smothering the flames. Never use water, foam, powder or CO2 extinguishers on oil fires. These can spread the fire or cause explosions.

Image

Safer Alternatives to Traditional Chip Pans

Modern cooking technology offers much safer ways to enjoy chips at home.

✓ Oven chips are the simplest solution. Today’s oven chips taste good, cook in about 20 minutes, and pose no fire risk. They’re also healthier, using far less oil than deep-fried alternatives.

✓ Air fryers have become popular for good reason. They circulate hot air to create crispy chips. There’s no vat of hot oil, no risk of overheating and modern air fryers have automatic shut-off features.

✓ Thermostat-controlled electric deep-fat fryers offer a safer middle ground if you want that authentic deep-fried taste. The built-in thermostat prevents the oil from reaching dangerous temperatures. Many models feature cool-touch exteriors, automatic shut-offs and secure lids that contain any oil splatter.

 Professional chip shops remain an option. Let the experts handle the hot oil, and you can enjoy chips without any of the home fire risks.

Essential Fire Safety Equipment for Your Kitchen

Beyond avoiding chip pan fires, every UK kitchen needs proper fire safety equipment.

Smoke alarms should be fitted on every level of your home, including near the kitchen (but not in it, as cooking steam causes false alarms). Test your alarms monthly and replace batteries annually. Interconnected alarms throughout your home ensure everyone hears the warning, no matter where the fire starts.

A Class F fire extinguisher is designed for kitchen fires involving cooking oils and fats. If you choose to keep one, make sure everyone in your household knows where it is and how to use it. You can learn more about the proper use of fire extinguishers through our product demonstration videos.

A fire blanket was once recommended for chip pan fires. But fire services now advise against using them on deep-fat fires due to the risk of burns and the blanket slipping off. However, they remain helpful in smothering other small fires and wrapping around someone whose clothes have caught fire.

Regular fire risk assessments ensure your home’s fire safety measures are adequate. Whether you’re a homeowner, landlord or business owner, understanding your specific fire risks helps you put in place appropriate safety measures.

Take Action to Protect Your Home

Chip pan fires remain preventable. The statistics tell a sobering story: thousands of injuries, dozens of deaths and countless homes damaged each year, all from a cooking method that has safer alternatives readily available.

Ready to improve your kitchen fire safety? We offer everything you need, from Class F fire extinguishers designed for cooking oil fires to smoke alarms that provide early warning. Our experts can also conduct a fire risk assessment of your property, identify potential hazards, and recommend appropriate safety measures tailored to your home.

Don’t wait for a close call to take fire safety seriously. Explore our range of kitchen fire safety equipment today, or contact our team for advice on protecting your home and family from chip pan fire risks.

★★★★★

“Easy to use website. I found the ideal produce to replace my smoke alarm sytem quickly and easily. Update to a modern version of my old system. Good price, fast delivery, easy to fit. Fixed to the original interlinked wiring in place. Very tidy, modern looking system. Would shop here again.”

Ian Beevers

★★★★★

“Great business to deal with. Good information about different fire extinguisher types etc. on websites and delivered the next day. Would certainy use again.”

Michael Harding

What is Awaab’s Law?

Awaab’s Law is a social housing law that came into force on 27 October 2025. It requires landlords to investigate and fix emergency hazards and significant damp and mould within strict timeframes. The law is named after two year old Awaab Ishak, who died from prolonged mould exposure in his home in 2020. It aims to protect the four million social housing tenants across England. This legislation strengthens tenants’ rights and ensures landlords take their fire safety and housing responsibilities seriously, making homes safer for vulnerable families.

Key Takeaways

  • Awaab’s Law sets strict timeframes for landlords to investigate and fix hazards.
  • Emergency hazards must be investigated and made safe within 24 hours of being reported.
  • Significant damp and mould hazards must be investigated within 10 working days and made safe within five working days.
  • The law applies to most social housing tenancies in England.
  • Landlords must consider your circumstances when they assess hazards.
  • The law is being phased in, with more hazards to be covered in 2026 and 2027.
  • You can enforce the law through complaints processes, the Housing Ombudsman or court action.

When did Awaab’s Law come into force?

Awaab’s Law came into force on 27 October 2025. This marked a significant milestone in social housing reform.

The Government is implementing the law through a phased approach. This ensures the reforms work effectively in the long term. At the same time, it provides immediate protection for tenants facing the most dangerous conditions. Right now, the law covers all emergency hazards and significant damp and mould hazards. The Government plans to extend coverage to additional hazards in 2026 and all Housing Health and Safety Rating System (HHSRS) hazards except overcrowding by 2027.

Why the phased approach? It allows the government to test and learn from the initial rollout. This balances the urgent need to protect tenants with the practicalities of implementing comprehensive housing reform across England’s social housing sector.

Who does Awaab’s Law apply to?

Awaab’s Law applies to most people living in social housing with a tenancy agreement in England. This includes homes you rent from local councils and housing associations. The law covers approximately four million social rented homes across the country. It provides protection for millions of tenants and their families. You can find detailed guidance for social housing tenants on the Government website.

However, Awaab’s Law isn’t universal. There are some exceptions.

The law doesn’t typically apply to:

  • Supported housing or temporary accommodation if you occupy these under a licence agreement rather than a tenancy
  • Long leaseholders and owner-occupiers, including shared ownership properties

If you’re unsure whether Awaab’s Law applies to your situation, check your tenancy agreement. Or speak with your landlord to confirm your housing arrangement.

What hazards are covered under Awaab’s Law?

Awaab’s Law covers two main categories of hazards: emergency hazards and significant damp and mould hazards.

Emergency hazards are issues that pose an immediate and significant risk of harm to your health or safety. They require action within 24 hours. These include:

  • Gas or carbon monoxide leaks
  • Fire safety concerns – e.g. smoke alarms should be repaired within 24 hours
  • Broken boilers
  • Loss of water supply
  • Dangerous electrical faults, such as exposed wiring
  • Major leaks
  • Broken external doors or windows that compromise your security
  • Very serious damp and mould
  • Major structural problems

Significant damp and mould hazards are conditions that could cause serious harm to your health if not addressed urgently. They may not require the immediate 24-hour response of emergency hazards. But any damp and mould that poses a significant risk to your health must be investigated within 10 working days. Your landlord must then make it safe within five working days of completing the investigation.

The Government provides comprehensive guidance for landlords on identifying and responding to these hazards appropriately.

What are the timeframes for landlords under Awaab’s Law?

Awaab’s Law sets clear, mandatory timeframes for social housing landlords to investigate and resolve hazards.

For emergency hazards, landlords must investigate and make your property safe within 24 hours of becoming aware of the issue. This rapid response time reflects the serious and immediate nature of emergency hazards. These could cause harm to your health or safety if not addressed promptly.

For significant damp and mould hazards, landlords must investigate the issue within 10 working days of you notifying them. They must then make your property safe within five working days of completing the investigation.

What if further work is needed to prevent the hazard coming back? Perhaps the landlord needs to address underlying structural causes. In these cases, they must begin this work or make plans for it to start within five working days of the investigation. All work must physically start within 12 weeks at the latest.

Throughout this process, your landlord must keep you updated on progress. They must also provide advice on staying safe during repairs.

What are the key deadlines under Awaab’s Law?

The table below summarises the mandatory timeframes that social housing landlords must follow when they respond to hazards under Awaab’s Law.

Image

How does a landlord assess whether a hazard is significant or an emergency?

Your landlord must make an informed assessment based on multiple factors when you report a hazard.

They must consider:

  • The type of problem you’re reporting (such as mould, broken heating or unsafe stairs)
  • The people living in your home, including children who stay overnight, even if not every night
  • Your personal circumstances and those of other residents, including age, health conditions, mobility issues or weakened immune systems that could increase vulnerability to certain hazards
  • What they already know about your property, including any existing problems or recent repair work
  • How likely the problem is to cause harm and how serious that harm could be

Landlords can’t assume that damp and mould is caused by your ‘lifestyle’ without proper investigation. Everyday activities such as cooking, bathing, washing and drying laundry inevitably produce moisture. If this leads to a hazard, your landlord must address it under Awaab’s Law.

You can find more information on the assessment process on the Make Things Right campaign website.

What should tenants do if their landlord doesn’t comply with Awaab’s Law?

You have several routes to take action if your landlord fails to meet Awaab’s Law requirements.

First, use your landlord’s formal complaints process. You should find this clearly explained in your tenancy agreement or on your landlord’s website. Keep detailed records of all communication. This includes when you reported the issue, how you reported it, who you spoke to and any responses you received. Take photographs or videos of the hazard if possible to document the problem.

Not satisfied with your landlord’s final response to your complaint? You can escalate the matter to the Housing Ombudsman. This is a free and impartial service that investigates complaints about social landlords.

The Ombudsman can order landlords to:

  • Carry out repairs
  • Pay compensation for distress and inconvenience
  • Issue formal apologies
  • Make service improvements to prevent similar issues happening again

You have other options too. You can consider the Pre-Action Protocol for Housing Conditions Claims. This provides a structured process for resolving disputes before court action. Or you can ultimately take your landlord to court for breach of contract.

Remember this. Your landlord can’t evict you or treat you unfairly for making a complaint about hazards in your home.

How will Safelincs support landlords with Awaab’s Law compliance?

At Safelincs, we understand the vital importance of fire safety and hazard management in social housing. Awaab’s Law focuses primarily on emergency hazards and damp and mould. But many of the emergency situations the law covers intersect with fire safety concerns. These include electrical hazards and structural integrity issues that could compromise fire safety systems.

We’re committed to supporting social housing landlords in maintaining safe homes for their tenants. Our comprehensive range of fire safety products helps landlords meet their broader safety obligations. From smoke alarms and carbon monoxide detectors to fire extinguishers and emergency lighting, we’ve got you covered. We also provide expert guidance on fire safety compliance. And we can advise on how fire safety integrates with the wider requirements of Awaab’s Law.

Are you a social housing landlord looking for support with your fire safety responsibilities? Need advice on how Awaab’s Law impacts your fire safety obligations? Contact our expert team at Safelincs. We’re here to help you create safer homes for your tenants and ensure full compliance with all relevant legislation.

Frequently Asked Questions

What is the 24 hour rule under Awaab’s Law?
The 24 hour rule under Awaab’s Law requires landlords to investigate and make safe any emergency hazard within 24 hours of becoming aware of it. Emergency hazards are issues that pose an immediate and significant risk to your health or safety, such as gas leaks, fire risks or similar, exposed wiring or broken external doors.
Are private landlords covered by Awaab’s Law?
Private landlords aren’t currently covered by Awaab’s Law, which applies specifically to social housing tenancies in England. The law covers homes rented from local councils and housing associations but doesn’t extend to the private rented sector, though private landlords still have separate legal obligations to maintain their properties.
What is considered significant damp and mould under Awaab’s Law?
Significant damp and mould under Awaab’s Law is any damp or mould that poses a significant risk of harm to your health or safety that a reasonable person with relevant knowledge would take steps to address urgently. Landlords must consider your individual circumstances, including any health conditions, when they assess significance.
Can a landlord evict me for complaining about hazards?
Your landlord can’t evict you or treat you unfairly for making a legitimate complaint about hazards in your home. Complaining about disrepair or hazardous conditions is a protected activity. Landlords who attempt retaliatory eviction face legal consequences. You should never be afraid to report issues that affect your health and safety.
What happens if my landlord can’t fix a hazard within the timeframe?
If your landlord can’t fix a hazard within the required timeframe, they must legally offer you suitable alternative accommodation at their expense until they complete the repairs. Your landlord must continue to keep you informed about repair progress and should discuss any additional costs or inconvenience payments with you.

Why You Need a Travel CO Alarm on Every Trip: A Safety Guide for Travellers

Key Takeaways

  • Carbon monoxide poses a heightened risk in travel accommodation, particularly in countries without CO alarm legislation.
  • The loss of 24-year-old Hudson Foley sparked the Pack Safe Appeal, urging all travellers to carry portable CO detectors.
  • Travel carbon monoxide alarms undergo rigorous testing to ensure reliability in caravans, boats, tents and motorhomes.
  • Small spaces like tents and caravans allow CO concentrations to build up faster than in homes.
  • Modern travel CO detectors are lightweight, portable and designed for travel environments.

Every year, thousands of British travellers set off on adventures. They backpack through South America. They caravan through the Scottish Highlands. But there’s an invisible danger that claims over 50 lives annually in the UK alone. That danger is carbon monoxide. And for one British family, it changed everything.

A Family’s Mission: The Hudson Foley Story and the Pack Safe Appeal

Hudson Foley was 24 years old. He went to sleep in a homestay in Quito, Ecuador but lost his life because of carbon monoxide poisoning from an undetected leak. 

Hudson’s death wasn’t just another statistic: it became a catalyst for change. His family established the Pack Safe Appeal in his memory. It’s more than awareness. It’s a movement born from loss. Cathy Foley and family transformed their grief into action. They’ve appeared on BBC Breakfast. They’ve partnered with The Safer Tourism Foundation. Because they don’t want any other family to endure what they have.

Their message couldn’t be clearer. Countries like Ecuador, South America and Australia don’t require carbon monoxide alarms by law. These are popular backpacking destinations. The accommodation Hudson trusted had no detection system. This isn’t negligence. It’s a regulatory gap and a lack of education that leaves millions vulnerable.

Understanding the Hidden Threat: Why Travel Increases CO Risk

Carbon monoxide is the silent killer. You can’t see it. You can’t smell it. You can’t taste it.

And when you’re travelling, the risk multiplies.

The Perfect Storm: Small Spaces and Multiple Sources

Think about where you stay when you’re camping, caravanning or on a boat. You’re surrounded by potential CO sources:

  • Vehicle exhausts from nearby cars and motorhomes.
  • Portable generators powering campsites.
  • Barbecues and camping stoves.
  • Boat engines and onboard heating systems.
  • Poorly maintained appliances in budget accommodation.

Carbon monoxide builds up faster in small, confined spaces. A tent, caravan or boat cabin can reach dangerous CO levels in minutes. Not hours. Minutes.

The Regulatory Lottery: Safety Standards Vary

The UK has strict regulations. We require gas safety checks, chimney sweeping and flue clearing. But these standards don’t follow you abroad. Your protected home environment stays at home. Only a travel carbon monoxide detector can fill that gap.

The Science of Travel CO Alarms: Not All Detectors Are Equal

Here’s what many travellers don’t know: your home CO alarm isn’t always designed for travel.

Travel carbon monoxide alarms undergo additional testing under BS EN50291-2. They’re subjected to movement, vibration and environmental conditions that could break standard alarms.

This specialised testing ensures these devices can:

  • Function reliably during vehicle movement.
  • Withstand temperature changes in tents and caravans.
  • Resist humidity in marine environments.
  • Stay accurate despite constant relocation.

Alarms certified to BS EN50291-2 have specific classifications. They’re either ‘suitable for camping/caravans/boats’ or ‘suitable for camping/caravans/motorhomes’. This isn’t marketing speak. It’s certification that ensures your travel CO alarm will work when you need it.

Essential Features of Modern Travel Carbon Monoxide Detectors

Travel CO detectors, like the UltraFire ULLCO10 with travel strap, have a minimal design with maximum protection.

Portability Without Compromise:

  • Compact, lightweight design.
  • Travel strap for securing to bags, tents or caravan fixtures.
  • 10-year sealed lithium battery: no replacements needed.
  • Clear LED indicators you can see in low light.

Reliability When It Matters:

  • 85dB alarm.
  • Kitemarked to BS EN 50291-1 and BS EN 50291-2 standards.
  • Works in homes, hostels, Airbnbs and rooms with fuel-burning appliances.
  • Separate test and silence buttons for easy maintenance.

Practical Protection: Choosing the Right CO Alarm for Travel

Different trips need different protection. So how do you choose the right CO alarm for travel?

For Backpackers and Hostel Stays: You need ultra-portable models with securing straps. Clip them inside your backpack during transit. Deploy them quickly in any accommodation.

For Caravan and Motorhome Adventures: Choose models certified for vehicular movement. Road vibration triggers false alarms in inadequate detectors. Don’t risk it.

For Boat and Marine Travel: You need alarms tested for marine environments. Boat-specific CO detectors must handle humidity and salt air. And they need to stay accurate.

Real Stories, Real Impact: Why Every Traveller Needs Protection

Sarah’s a gap-year student from Manchester. She shares her experience:

“I never thought about CO until I met a fellow backpacker. His roommate nearly died in a Thai hostel. Now my travel CO alarm goes everywhere. It weighs less than my phone charger but could save my life.”

The statistics back Sarah’s caution. We don’t have comprehensive global data. But documented cases show a pattern: travellers face elevated CO risk. Especially in budget accommodation and rural settings where safety standards lag.

Taking Action: Your Travel Safety Checklist

Before You Travel:

  1. Buy a certified travel carbon monoxide alarm.
  2. Test it and learn what the indicators mean.
  3. Pack extra batteries if your model isn’t sealed.
  4. Research CO safety standards in your destination.
  5. Get to know the signs and symptoms of CO poisoning.

At Your Accommodation:

  1. Set up your CO detector immediately.
  2. Position it at breathing height when sleeping.
  3. Check for potential CO sources nearby.
  4. Never ignore an alarm: evacuate immediately and get help.

Supporting the Movement: We proudly support the Pack Safe Appeal. Get 15% off travel CO alarms with code HUDSON15 at checkout. We’re honouring Hudson’s memory and protecting future travellers.

The Cost of Complacency vs The Value of Protection

A quality CO detector for travel costs less than one night in most hostels. Yet it provides years of protection.

The UltraFire ULLCO10 has a 10-year warranty and battery life. That’s mere pence per day. Insignificant compared to the protection it provides.

Carbon monoxide doesn’t discriminate. It doesn’t care if you’re a seasoned adventurer or a first-time traveller. Your destination doesn’t matter. Neither does your budget or accommodation type.

But you can take control. Carry a certified travel carbon monoxide detector. You’re not just protecting yourself. You’re joining a movement started by families like Hudson Foley’s. You’re ensuring every traveller has the chance to return home safely.

Don’t let your next adventure become a preventable tragedy. Explore our range of certified travel CO alarms. Take advantage of special pricing in support of the Pack Safe Appeal.

How to Choose the Best Travel Carbon Monoxide Detector for Hotels, Airbnbs and Rentals

Key Takeaways

  • Carbon monoxide poisoning represents a preventable risk that travellers can protect themselves against.
  • A portable travel CO alarm provides essential protection in hotels, Airbnbs and holiday rentals.
  • The best travel carbon monoxide detectors combine portability, dual certification and long battery life.
  • Featured on Good Morning Britain, the UltraFire ULLCO10 with travel strap offers dedicated travel protection.
  • Choose a Kitemarked detector certified to both BS EN 50291-1 and BS EN 50291-2 for complete protection.

Every year, families check into accommodation without knowing they’re missing a crucial piece of safety equipment. People pack first aid kits. People buy travel insurance. But there’s an invisible danger in hotels and holiday rentals: carbon monoxide.

The decision to carry a travel carbon monoxide alarm isn’t about fear. It’s about taking control of your family’s safety in unfamiliar surroundings.

Understanding the Carbon Monoxide Risk

Carbon monoxide forms when fuel doesn’t burn completely. It has no colour, no smell, no taste. In accommodation, it can come from:

  • Faulty boilers or water heaters
  • Blocked chimney flues
  • Poorly maintained gas appliances
  • Inadequate ventilation around heating systems

UK legislation requires CO alarms to be installed in properties with solid fuel burning appliances and in all rented homes anywhere in the UK if they have a fixed appliance. But requirements vary between England, Scotland, Wales and Northern Ireland. And internationally? Standards differ from country to country.

This creates uncertainty for travellers.

The early symptoms of CO exposure mirror common travel complaints. Headache. Tiredness. Nausea. Dizziness. You might assume it’s jet lag or unfamiliar food. This similarity makes carbon monoxide particularly dangerous in travel situations.

What Makes a Great Travel Carbon Monoxide Alarm?

Essential Certification Standards

When choosing a travel CO alarm, look for Kitemark certification. Specifically, you need devices certified to both:

  • BS EN 50291-1 (for domestic use)
  • BS EN 50291-2 (for caravans and boats)

This dual certification confirms your detector meets rigorous testing standards for various environments.

Designed for Portability

The best travel carbon monoxide detectors balance compact design with reliable function. The UltraFire ULLCO10 with travel strap, featured on ITV’s Good Morning Britain, was designed specifically for travellers. Its included strap allows secure positioning without permanent mounting.

Long-Life Power Sources

For regular travellers, sealed lithium batteries offering 10-year lifespans eliminate battery concerns. Models like the FireAngel FA3322 and UltraFire ULLCO10 feature built-in batteries designed to last the detector’s entire operational life.

Choosing Your Travel CO Detector

For Dedicated Travel Protection

The UltraFire ULLCO10 with Travel Strap stands out as purpose-built for travellers and backpackers.

Key features:

  • 10-year sealed lithium battery.
  • Dual Kitemark certification (BS EN 50291-1 and BS EN 50291-2).
  • Supplied with travel strap.
  • 10-year warranty.

This model addresses the specific needs of people who regularly stay in different accommodation.

Digital Display Options

Some travellers prefer visible CO level monitoring. Digital models provide real-time readings and additional features:

The Kidde K7DCO displays CO levels from 10ppm and includes peak level memory to record the highest CO concentration detected.

The FireAngel FA3322 combines a digital display with Sleep Easy technology, which prevents low battery warnings between midnight and 6am. It shows CO levels, temperature and warning conditions.

Both models carry the essential dual Kitemark certifications.

Budget-Friendly Protection

The Kidde K7CO and FireAngel FA3313 offer certified protection with replaceable AA batteries.

These models provide:

  • 10-year operational lifespan.
  • Dual Kitemark certification.
  • Proven reliability.
  • Lower initial cost.

They’re suitable for occasional travellers who want quality protection.

Extended Stay Solutions

For longer accommodation stays, consider the Firehawk CO7B-10Y or FireAngel FA3820.

Both feature:

  • 10-year sealed batteries.
  • Compliance with 2022 Welsh and Scottish legislation.
  • Low-volume test functions for discrete weekly testing.
  • Dual Kitemark certification.

Positioning Your Detector Effectively

Travel CO detectors require adaptable positioning:

  • Place at breathing height when sleeping (typically bedside table level).
  • Position between any CO source and sleeping area.
  • Keep at least one metre from cooking appliances.
  • Avoid bathrooms where humidity might affect operation.
  • Test the alarm when you first arrive.

The portability of these devices means you can adjust placement based on each room’s layout.

The Broader Impact of Travel CO Protection

Carrying a travel CO alarm represents more than personal safety. It demonstrates the importance of CO protection to the hospitality industry.

When guests arrive equipped with safety devices, it highlights the value of proper CO detection. This awareness can encourage property improvements that benefit all future guests.

Regional Standards and Protection

The UK has strengthened CO alarm requirements in recent years:

  • Scotland introduced new standards in 2022.
  • Wales updated landlord requirements in 2022.
  • Northern Ireland implemented new landlord regulations in 2024.

But these standards only apply within UK borders. Your travel carbon monoxide detector provides consistent protection regardless of local regulations.

Making CO Detection Routine

Integrate CO detection into your standard travel preparation:

  1. Keep your travel CO alarm with essential documents.
  2. Test it before departure and replace batteries if required.
  3. Check your accommodation immediately upon arrival.
  4. Position the detector appropriately for each room.
  5. Know the alarm sounds and what they mean.

Consider purchasing a dedicated travel unit rather than moving home detectors. This ensures continuous protection at home and maintains travel readiness. It is also important to educate everyone in your party about the symptoms before you travel.

A Note on Product Selection

We stock various CO alarms suitable for travel, from basic models to advanced digital displays. Each product we offer meets strict UK certification standards. The models mentioned here represent different price points and features, but all provide the essential protection travellers need.

Your family’s safety shouldn’t depend on unknown accommodation standards. A certified travel carbon monoxide alarm offers peace of mind for less than the cost of airport parking.

We believe every traveller deserves proper protection. That’s why we offer comprehensive advice alongside our range of certified travel CO detectors. Find the right protection for your travel needs at Safelincs. Because returning home safely isn’t just about avoiding obvious dangers. It’s about preparing for the risks you can’t see.

How many smoke and CO detectors do I need?

Protecting your home from fire and carbon monoxide requires careful planning and preparation. The number of smoke and CO detectors you need depends on your property’s layout, the number of floors and the location of fuel-burning appliances. Getting this right could save your life.

Understanding Combined Detection

A smoke and CO alarm combines two essential safety technologies in one device. These units detect both fire hazards through optical smoke sensors and dangerous carbon monoxide levels through electrochemical sensors. By installing combined detectors, you reduce the number of devices on your ceiling while maintaining comprehensive protection.

The advantage of these dual-purpose alarms extends beyond space-saving. Modern combined units provide distinct audio warnings for each threat. Some models feature voice alerts that clearly announce “FIRE, FIRE” or “WARNING CARBON MONOXIDE”, removing any confusion about which danger is present. This clarity proves crucial when seconds count.

Calculating Your Detection Requirements

Smoke Detection Coverage

Every floor of your home needs at least one smoke alarm. For optimal protection, install alarms in:

  • Each bedroom
  • Outside sleeping areas (hallways, landings)
  • Living rooms
  • The bottom of staircases

For maximum coverage, a typical two-storey, three-bedroom home should have a minimum of five smoke detection points: one in each bedroom, one on the landing and one in the ground floor hallway. There should also be a heat alarm in the kitchen.

Carbon Monoxide Detection Needs

Carbon monoxide poses risks wherever fuel burns. Install CO detection:

  • On every floor containing fuel-burning appliances
  • Within 3 metres of boilers, fires or stoves
  • In bedrooms, if appliances or flues are present on the same floor
  • Near attached garages

Properties with gas central heating typically need CO detection on at least two floors. Homes with multiple fuel-burning appliances may require three or more detection points.

Strategic Placement for Maximum Protection

Bedroom Protection

Bedrooms demand priority attention. Carbon monoxide poisoning often occurs during sleep when victims cannot detect symptoms. Install a smoke and CO2 detector in each bedroom, positioning it on the ceiling at least 30 cm from the walls. For sloped ceilings, place detectors within 90cm of the peak.

Living Areas and Hallways

Hallways connecting bedrooms to exits need combined detectors. These locations catch smoke travelling between rooms whilst monitoring CO levels from heating systems. Living rooms with gas fires or wood burners require dedicated protection. Mount detectors centrally on the ceiling, away from air vents or fans that might delay detection.

Kitchen Considerations

Kitchens present unique challenges. Cooking fumes trigger false alarms in standard smoke detectors. If your kitchen contains gas appliances, install a CO-only alarm near the cooker. Position smoke detection just outside the kitchen door to avoid nuisance alarms and maintain fire protection.

Choosing the Right Combined Alarms

The market offers excellent combined smoke and carbon monoxide alarms with varying features. Battery-powered models, such as the Kidde K10SCO, provide 10-year protection with voice warnings that distinguish between threats. The FireAngel SCB10-R features a built-in battery that lasts the product’s entire lifespan, eliminating concerns about battery replacement.

When selecting alarms, consider models certified to both BS EN 14604 (smoke detection) and BS EN 50291-1 (carbon monoxide detection). These dual certifications ensure your chosen alarm meets rigorous safety standards for both hazards.

Installation Best Practices

Ceiling Mounting

Most combined detectors work best when ceiling-mounted. CO spreads evenly through rooms, making ceiling placement effective for both smoke and gas detection. Follow manufacturer guidelines for exact positioning, typically central to the room and away from corners where air circulation is poor.

Wall Mounting Considerations

Some situations require wall mounting. When ceiling installation proves impossible, mount detectors high on the walls, 15-30 cm below the ceiling. Ensure wall-mounted units are not positioned above doors and windows to prevent drafts from affecting performance.

Avoiding Installation Mistakes

Never install detectors:

  • In bathrooms (humidity causes false alarms)
  • Near windows, doors or vents
  • In garages (vehicle fumes trigger alarms)
  • Where temperatures exceed the manufacturer’s specifications

Maintaining Your Detection System

Your smoke and carbon monoxide (CO) alarm system requires regular maintenance. Test all alarms monthly using the test button. This simple action confirms that both the smoke and CO sensors function correctly. Many combined alarms feature separate test sequences for each sensor type.

All smoke alarms need replacement after 10 years.

Clean detectors every six months using the soft brush attachment on your vacuum. Dust accumulation reduces sensitivity and increases the likelihood of false alarms. After decorating or renovation work, check that alarms haven’t been painted over or damaged.

Special Considerations

Rental Properties

Landlords must install smoke alarms on every floor and carbon monoxide (CO) alarms in rooms with solid fuel appliances. Combined units satisfy both requirements efficiently. Tenancy agreements should clearly outline testing responsibilities, although landlords remain liable for ensuring alarms function correctly at the start of the tenancy.

Protect your family and friends and get gas safe

Vulnerable Occupants

Households with elderly residents, young children or people with hearing impairments need additional considerations. Interconnected alarm systems ensure all detectors sound simultaneously, providing earlier warning throughout the property. Strobe light attachments help those with hearing difficulties.

Property Extensions

Adding conservatories, loft conversions or garage conversions changes your detection requirements. Each new habitable space needs appropriate coverage, as specified by building regulations. Fuel-burning appliances in extensions demand CO protection regardless of the main property’s existing coverage.

Regional Regulations Across the UK

Where you live changes what the law requires. Since February 2022, every home in Scotland must have interlinked smoke and heat alarms. Carbon monoxide detectors are required wherever there’s a carbon-fuelled appliance or flue. When one alarm sounds, they all sound. It’s the law for everyone, not just landlords.

England, Wales and Northern Ireland work differently. Landlords face legal duties across all regions. But if you own your home, the rules vary. England and Wales apply building regulations to new builds and major works. They don’t require existing homeowners to upgrade. Northern Ireland follows similar lines. The guidance in this article gives you strong protection for any home. But always check what applies where you live. Because your family’s safety matters more than any minimum standard.

Creating Your Detection Plan

Map your property floor by floor. Mark locations of:

  • Bedrooms
  • Fuel-burning appliances
  • Potential fire hazards
  • Escape routes

This visual guide identifies where combined smoke and CO detectors provide the best protection.

The best combined smoke and carbon monoxide alarm for your home strikes a balance between features, reliability and coverage requirements. By understanding your property’s specific needs and following placement guidelines, you create a detection network that protects against both immediate fire dangers and invisible carbon monoxide threats.

Mel Saunders

Head of Marketing

With over 20 years of experience in content writing, design and marketing, Mel now heads up the Content & Marketing Team at Safelincs. Having been in the fire safety industry for over 5 years, Mel has now developed a deep understanding of some of the critical issues facing the industry. Alongside her team, she aims to support the public with resources and information to help them improve fire safety at home, in the workplace or in 3rd sector organisations.

What is the Primary Purpose of an Automatic Fire Alarm System?

The primary purpose of an automatic fire alarm system is to provide early detection of fire conditions and alert occupants to evacuate safely. This critical safety equipment serves as the first line of defence against fire hazards in both commercial and residential buildings, giving people precious time to escape before conditions become life threatening.

Early Detection Saves Lives

An automatic fire alarm system continuously monitors your building for signs of fire through various detection methods. Heat detectors respond to temperature changes, while smoke detectors identify particles in the air that indicate combustion. This constant vigilance means the system can detect a fire in its earliest stages, often before occupants become aware of the danger.

The speed of detection directly impacts survival rates. Studies show that people have just minutes to evacuate once a fire takes hold. An automatic system provides this vital early warning, activating audible and visual alarms throughout the building to ensure everyone receives the alert simultaneously.

Fire doors in schools

Fire Alarm System Components Work Together

A complete fire alarm system comprises several key components that work in coordination. The fire alarm panel serves as the central hub, monitoring all connected devices and controlling the system’s response. Automatic detectors continuously sense environmental changes, and manual call points allow occupants to trigger the alarm if they spot a fire before the automatic sensors respond.

Sounders provide the audible warning that alerts occupants to evacuate. Beacons offer visual indication to ensure compliance with accessibility requirements. This integrated approach ensures comprehensive coverage and reliable operation when needed most.

Commercial Fire Alarm System Requirements

The Regulatory Reform (Fire Safety) Order 2006 requires businesses and organisations to conduct fire risk assessments through competent persons. These assessments determine the appropriate fire alarm system specification based on building layout, occupancy and risk factors.

Commercial premises typically require systems compliant with BS 5839-1: 2017, which covers everything from simple manual systems to complex networked installations. The standard ensures adequate detection coverage and warning capability for the specific application.

Types of Fire Alarm Panel Systems

Three main types of fire alarm panel systems are available, each suited to different applications:

  • Conventional Systems divide buildings into zones and identify which area has activated. These cost effective solutions work well for smaller premises with straightforward layouts.
  • Two Wire Systems offer improved installation efficiency by allowing detectors and sounders to share the same circuit. This reduces installation time and costs while maintaining zone identification capability.
  • Addressable Systems provide the most advanced functionality, identifying the exact device that has activated. This precision helps emergency responders locate incidents quickly and enables sophisticated programming through cause and effect features.

Fire Alarm System Installation Considerations

Proper fire alarm system installation requires careful planning and professional expertise. The system design must account for building layout, occupancy patterns and environmental factors that could affect detector performance.

Qualified installers ensure devices are positioned correctly, wiring meets current standards, and the system integrates properly with other building safety equipment. Professional installation guarantees reliable operation and compliance with relevant regulations.

Beyond Detection: Complete Fire Safety

Whilst early detection and warning form the primary purpose of automatic fire alarm systems, modern installations often integrate with other fire safety measures. These may include automatic door release mechanisms, smoke control systems and connections to monitoring centres for immediate emergency response.

This integrated approach creates a complete fire safety strategy that not only alerts occupants but also helps contain the fire and facilitate emergency response efforts.

The investment in an automatic fire alarm system provides invaluable protection for life and property. When seconds count in a fire emergency, these systems deliver the early warning that can mean the difference between a safe evacuation and a tragedy.

Mel Saunders

Head of Marketing

With over 20 years of experience in content writing, design and marketing, Mel now heads up the Content & Marketing Team at Safelincs. Having been in the fire safety industry for over 5 years, Mel has now developed a deep understanding of some of the critical issues facing the industry. Alongside her team, she aims to support the public with resources and information to help them improve fire safety at home, in the workplace or in 3rd sector organisations.